 Tempusxr
- Documentation
- Exemples de suivi d'images
Interface personnalisée
Votre propre interface au-dessus de la caméra, écrite en HTML simple. Des éléments ne s'affichent que dans certains états, les boutons envoient des actions nommées, et une fenêtre s'ouvre à la demande.
Essayer
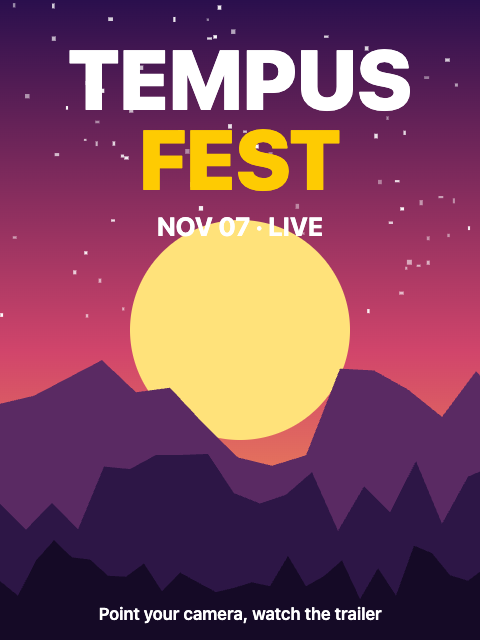
Ouvrez les démos sur un téléphone : la caméra a besoin d'une page sécurisée. Puis visez l'image ci-dessous, affichée sur un second écran ou imprimée.
A-Frame
Donnez overlay: #ui au composant tempusxr : le SDK utilise votre bloc à la place de celui par défaut. Les clics sur les éléments data-tx-action sont à vous de les traiter.
<!doctype html>
<html lang="en">
  <head>
    <meta charset="utf-8" />
    <meta name="viewport" content="width=device-width, initial-scale=1, viewport-fit=cover" />
    <title>Custom UI (A-Frame)</title>
    <!-- A-Frame, Tempusxr and the image tracker, as plain script tags. -->
    <script src="/node_modules/aframe/dist/aframe-v1.8.0.min.js"></script>
    <script src="/packages/sdk-aframe/dist/index.umd.cjs"></script>
    <script src="/packages/sdk-tracker-image/dist/index.umd.cjs"></script>
    <style>
      .pill {
        padding: 6px 16px;
        border-radius: 999px;
        background: rgba(0, 0, 0, 0.55);
        color: #fff;
        font-weight: 700;
      }
    </style>
  </head>
  <body>
    <!--
      Your own interface: a block of HTML marked as an overlay. data-tx-slot places an element,
      data-tx-show shows it in one state only ("scanning", "found"), data-tx-action names a click.
      Show poster.png to the camera, then tap "Next color".
    -->
    <div id="ui" class="tx-overlay">
      <div data-tx-slot="top-left" class="pill">My AR app</div>
      <div data-tx-slot="top-right" class="tx-rail">
        <button class="tx-btn" type="button" data-tx-action="info" aria-label="Help">?</button>
      </div>
      <div data-tx-slot="center" data-tx-show="scanning" class="pill">Find the poster</div>
      <div data-tx-slot="bottom" data-tx-show="found">
        <button class="tx-cta" type="button" data-tx-action="color">Next color</button>
      </div>
      <div class="tx-modal" data-tx-modal="info" hidden>
        <div class="tx-panel">
          <button class="tx-close" type="button" data-tx-action="close" aria-label="Close">
            x
          </button>
          <h2>Custom UI</h2>
          <p>This interface is plain HTML. Change it, style it, add buttons.</p>
        </div>
      </div>
    </div>

    <a-scene
      tempusxr="tracker: image; targets: /examples/poster-video/poster.txr; overlay: #ui"
      renderer="alpha: true"
      vr-mode-ui="enabled: false"
    >
      <a-camera></a-camera>
      <a-light type="ambient" intensity="1"></a-light>
      <a-entity tempusxr-image-target="index: 0">
        <a-box id="box" position="0 0 0.15" scale="0.3 0.3 0.3" color="#fecb02"></a-box>
      </a-entity>
    </a-scene>

    <script>
      const colors = ['#fecb02', '#ff5e62', '#6ec1ff', '#8b4bb5'];
      let next = 1;
      document.getElementById('ui').addEventListener('click', (event) => {
        const action = event.target.closest('[data-tx-action]')?.dataset.txAction;
        if (action === 'color')
          document.getElementById('box').setAttribute('color', colors[next++ % colors.length]);
      });
    </script>
  </body>
</html>
Three.js
Passez votre élément dans l'option overlay de create(). ar.ui.on('action', nom => ...) reçoit le clic de chaque bouton data-tx-action.
<!doctype html>
<html lang="en">
  <head>
    <meta charset="utf-8" />
    <meta name="viewport" content="width=device-width, initial-scale=1, viewport-fit=cover" />
    <title>Custom UI (Three.js)</title>
    <!-- Three.js with the SDK, as a page without a bundler loads it. -->
    <script type="importmap">
      {
        "imports": {
          "three": "/node_modules/three/build/three.module.js",
          "@tempusxr/sdk-core": "/packages/sdk-core/dist/index.js",
          "@tempusxr/sdk-three": "/packages/sdk-three/dist/index.js",
          "@tempusxr/sdk-tracker-image": "/packages/sdk-tracker-image/dist/index.js"
        }
      }
    </script>
    <style>
      html,
      body {
        margin: 0;
        height: 100%;
        background: #111;
      }
      .pill {
        padding: 6px 16px;
        border-radius: 999px;
        background: rgba(0, 0, 0, 0.55);
        color: #fff;
        font-weight: 700;
      }
    </style>
  </head>
  <body>
    <!--
      Your own interface: a block of HTML marked as an overlay. data-tx-slot places an element,
      data-tx-show shows it in one state only ("scanning", "found"), data-tx-action names a click.
      Show poster.png to the camera, then tap "Next color".
    -->
    <div id="ui" class="tx-overlay">
      <div data-tx-slot="top-left" class="pill">My AR app</div>
      <div data-tx-slot="top-right" class="tx-rail">
        <button class="tx-btn" type="button" data-tx-action="info" aria-label="Help">?</button>
      </div>
      <div data-tx-slot="center" data-tx-show="scanning" class="pill">Find the poster</div>
      <div data-tx-slot="bottom" data-tx-show="found">
        <button class="tx-cta" type="button" data-tx-action="color">Next color</button>
      </div>
      <div class="tx-modal" data-tx-modal="info" hidden>
        <div class="tx-panel">
          <button class="tx-close" type="button" data-tx-action="close" aria-label="Close">
            x
          </button>
          <h2>Custom UI</h2>
          <p>This interface is plain HTML. Change it, style it, add buttons.</p>
        </div>
      </div>
    </div>
    <div id="ar"></div>
    <script type="module">
      import * as THREE from 'three';
      import { create } from '@tempusxr/sdk-three';
      import '@tempusxr/sdk-tracker-image';

      const ar = create({ container: '#ar', overlay: document.getElementById('ui') });
      window.__ar = ar;
      const tracker = await ar.use('image', { targets: ['/examples/poster-video/poster.txr'] });

      const material = new THREE.MeshBasicMaterial({ color: '#fecb02' });
      const box = new THREE.Mesh(new THREE.BoxGeometry(0.3, 0.3, 0.3), material);
      box.position.z = 0.15;
      const content = new THREE.Group();
      content.add(box);
      ar.attach(tracker.anchors[0], content);

      const colors = ['#fecb02', '#ff5e62', '#6ec1ff', '#8b4bb5'];
      let next = 1;
      ar.ui.on('action', (name) => {
        if (name === 'color') material.color.set(colors[next++ % colors.length]);
      });

      await ar.start();
    </script>
  </body>
</html>
À retenir
data-tx-slotplace un élément (top-left,top-right,center,bottom), etdata-tx-showne l'affiche que dans un état.- Les boutons nommés
infoetcloseouvrent et ferment undata-tx-modal, sans code.